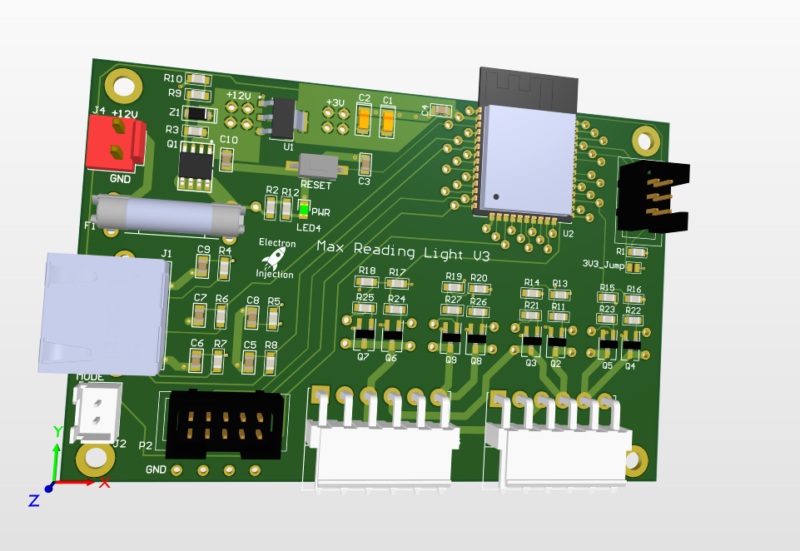
Posted on Leave a comment

Reading Light Bar

Requirements:

  • Diffused RGBW light that is great for reading that can be mounted to the wall
  • Requires different modes of operation. a) Crazy light show b) Adjustable R G B and W light via faders
    • Reading mode should start out at the set brightness and then fade incrementally for an hour until eventually shutting off. You shouldn’t notice the light is getting dimmer.

This was a basic project. The ESP32 is overkill for this, but I had it on hand. For linear faders that are normally used on a mixing console create voltage dividers that are read by the ADC on the ESP32. The light is dimmed with standard PWM and MOSFETs. Fun artifact. My son wanted to know why his ceiling fan was spinning backwards. He learned all about aliasing! Fun stuff. The PWM frequency I chose is just a hair faster than the rotation of the fan. Persistence of vision says humans can see light when it blinks fast enough, but tell that to the fan. It knows!

Lessons Learned

I don’t know what I was thinking! I used a linear regulator to step down from 12V to 3.3V. That’ll never happen again. Dissipating 8V+ when an ESP32 is pulling hefty power for a modern microcontroller is a bad, bad idea. I should have used a switching regulator. People worry about the noise. Fair enough. I worry about melting!

Those hefty VM3.96mm connectors at ref des: J5 and J3 are strong. They are also a bit too snug. They are meant to be plugged in and stayed plugged in. That’s good. The problem is if you ever want to take the connector off. They are kinda terrible. Granted, I’m sure I got these from Ali Express for $0.00001. Maybe you get what you pay for sometimes.

This was a fun little project. The greatest challenge was getting the clearance right on the 3D printed “tracks” for the LEDs.

As always I always struggle with wiring and connectors. The NAME OF CONNECTOR GOES HER wasn’t nearly as handy for plugging and unplugging as I had hoped. I used an RJ45 connector for the ESP32 to talk to the fader. That worked well. The lesson is a consumer-approved connector should always be used for “consumer approved tasks” whatever that means.

Posted on Leave a comment

ESP32TimerInterrupt Simple Example

Here’s a stripped down example of Khoi Hoang’s ESP32TimerInterrupt library. The library claims to run up to 16 compares (or alarms) on one, single timer. It seems to work well although I’ve only tested 3 timers thus far. I plan to use it on my Idiot Christmas Light Controller controlling triacs.

include <Arduino.h>
 /
   TimerInterruptTest.ino
   For ESP32 boards
   Written by Khoi Hoang
 Built by Khoi Hoang https://github.com/khoih-prog/ESP32TimerInterrupt
   Licensed under MIT license
 This is the most basic example using Khoi Hoang's ESP32TimerInterrupt library.  
   The library works well, but I found myself wanting an ultra basic version to understand the functionality
 */
 define TIMER_INTERRUPT_DEBUG 0
 define TIMERINTERRUPT_LOGLEVEL 0
 include "ESP32TimerInterrupt.h"
 // Change these to whatever GPIO you'd like to toggle
 define LED0 25 // GPIO 25
 define LED1 27 // GPIO 27
 define LED2 33 // GPIO 33
 // The lenght of each timer in milliseconds
 define TIMER0_INTERVAL_MS 100
 define TIMER1_INTERVAL_MS 3000
 define TIMER2_INTERVAL_MS 400
 void IRAM_ATTR TimerHandler0(void)
 {
   static bool toggle0 = false;
 //timer interrupt toggles pin LED0
   digitalWrite(LED0, toggle0);
   toggle0 = !toggle0;
 }
 void IRAM_ATTR TimerHandler1(void)
 {
   static bool toggle1 = false;
 //timer interrupt toggles LED1
   digitalWrite(LED1, toggle1);
   toggle1 = !toggle1;
 }
 void IRAM_ATTR TimerHandler2(void)
 {
   static bool toggle2 = false;
 //timer interrupt toggles LED2
   digitalWrite(LED2, toggle2);
   toggle2 = !toggle2;
 }
 // Init ESP32 timer 0,1, and 2
 ESP32Timer ITimer0(0);
 ESP32Timer ITimer1(1);
 ESP32Timer ITimer2(2);
 void setup()
 {
 pinMode(LED0, OUTPUT);
   pinMode(LED1, OUTPUT);
   pinMode(LED2, OUTPUT);
 Serial.begin(115200);
   while (!Serial)
     ;
 delay(100);
 Serial.print(F("\nStarting TimerInterruptTest on "));
   Serial.println(ARDUINO_BOARD);
 Serial.println(ESP32_TIMER_INTERRUPT_VERSION);
 Serial.print(F("CPU Frequency = "));
   Serial.print(F_CPU / 1000000);
   Serial.println(F(" MHz"));
 // Using ESP32  => 80 / 160 / 240MHz CPU clock ,
   // For 64-bit timer counter
   // For 16-bit timer prescaler up to 1024
 // Setup Timer0
   // Interval in microsecs
   if (ITimer0.attachInterruptInterval(TIMER0_INTERVAL_MS * 1000, TimerHandler0))
   {
     Serial.print(F("Starting  ITimer0 OK, millis() = "));
     Serial.println(millis());
   }
   else
     Serial.println(F("Can't set ITimer0. Select another freq. or timer"));
 // Setup Timer1
   // Interval in microsecs
   if (ITimer1.attachInterruptInterval(TIMER1_INTERVAL_MS * 1000, TimerHandler1))
   {
     Serial.print(F("Starting  ITimer1 OK, millis() = "));
     Serial.println(millis());
   }
   else
     Serial.println(F("Can't set ITimer1. Select another freq. or timer"));
 // Setup Timer2
   // Interval in microsecs
   if (ITimer2.attachInterruptInterval(TIMER2_INTERVAL_MS * 1000, TimerHandler2))
   {
     Serial.print(F("Starting  ITimer2 OK, millis() = "));
     Serial.println(millis());
   }
   else
     Serial.println(F("Can't set ITimer1. Select another freq. or timer"));
 Serial.flush();
 }
 void loop()
 {
 }